D-Star & Hotspots · Part 1 of 3
Pi-Star D-Star Hotspot, Part 1: Hardware, Assembly, and Installation
Glossary — read this first
- Hotspot
- A low-power personal gateway — typically a Raspberry Pi with an MMDVM board — that lets your handheld talk to D-Star reflectors when no repeater is in range.
- Pi-Star
- Andy Taylor’s (MW0MWZ) Linux distribution for MMDVM hotspots. Built on Raspberry Pi OS Lite (no desktop GUI) with a web dashboard for configuration.
- MMDVM (Multi-Mode Digital Voice Modem)
- Open-source firmware and hardware that handles the RF modem work for D-Star, DMR, System Fusion, P25, and other digital modes.
This three-part series walks through building a Pi-Star D-Star hotspot from parts to first QSO. Part 1 covers hardware choices, physical assembly, and getting Pi-Star onto the SD card.
Pi-Star ships as a ready-made image based on Raspberry Pi OS Lite — no desktop GUI. You do not install stock Raspberry Pi OS and Pi-Star separately unless you are doing advanced custom work. The supported path is to flash the Pi-Star image, boot, and open the web dashboard.
Hardware Recommendations
A working hotspot needs five things: a Raspberry Pi, an MMDVM board, a power supply matched to the Pi, an antenna appropriate for the frequency, and an optional display.
Raspberry Pi 5 vs Raspberry Pi Zero 2 W
| Board | Best for | Pi-Star fit | Trade-offs |
|---|---|---|---|
| Pi Zero 2 W | Desk or portable hotspot in a hat case | Excellent — the sweet spot for most D-Star-only hotspots | Single USB port; admin pages a bit slower than Pi 4/5; needs quality 2.5 A power |
| Pi 3B+ / Pi 4 | Multi-mode hotspots (D-Star + DMR + YSF) | Excellent — more CPU than a Zero needs, snappy web UI | Larger footprint; Pi 4 needs more power and cooling if enclosed |
| Pi 5 | Future-proof bench system, heavy multi-reflector use | Supported on Pi-Star 4.3.x images (2025–2026 releases) | Overkill for D-Star alone; requires official 5 V / 5 A USB-C PSU; runs warmer |
| Pi Zero W (original) | Budget reuse of old hardware | Works, but sluggish admin UI | Not recommended for new builds — Zero 2 W is the same size and far faster |
Practical advice: For a D-Star desk hotspot, a Raspberry Pi Zero 2 W stacked on an MMDVM_HS hat is the default recommendation. A Pi 5 makes sense if you already own one or plan to run multiple digital modes with cross-mode enabled.
MMDVM Board Options
Modern hotspots use boards running MMDVM_HS firmware — the open-source design popularized by the MMDVM_HS_Hat project. You will see them sold under many names (ZUMspot-style boards, BI7JTA boards, AURSINC kits, Jumbospot clones). They are largely interchangeable if the firmware is current.
- Single-band UHF (70 cm) hat — Most common for US D-Star handhelds. Look for 430–440 MHz or “UHF.”
- Single-band VHF (2 m) hat — For 145 MHz simplex with a 2 m D-Star radio.
- Dual-band hat — Both bands on one board; useful if you operate VHF and UHF.
- Duplex hat — For true repeater builds. Personal hotspots use Simplex Node mode in Pi-Star.
- Legacy DV-Mega — Older but still supported in Pi-Star. Dual-band; larger form factor.
When you buy a board, confirm band (UHF vs VHF), expected TX/RX offset (most simplex hats are zero offset), and whether an OLED is included.
OLED and Display Options
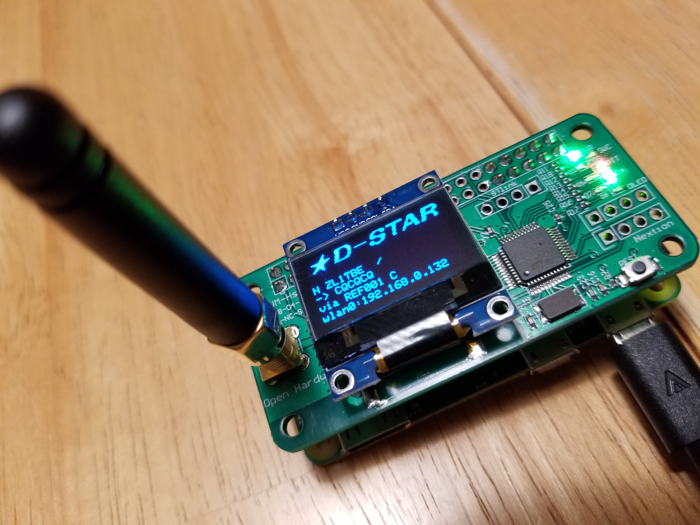
- SSD1306 OLED (included on most hats) — 0.96-inch status display. Configure later in Pi-Star Display Options. On some boards the OLED only activates over Wi-Fi.
- Nextion TFT touchscreen — Larger color display on UART. Supported in Pi-Star; optional.
- No display — Perfectly viable. The web dashboard is the real control surface.
Antenna Options
- Bench testing — Handheld rubber duck a few inches from the hotspot antenna is fine for initial setup.
- Desk hotspot — Short 70 cm antenna (Nagoya NA-771, Diamond SRH770S) on the hat SMA connector.
- Fixed location — Small mag-mount on a metal surface can outperform a stubby on a shelf.
- Separation — Keep the antenna a few inches from the Pi board if using Wi-Fi; an SMA extension cable helps.
Power Supply Options
- Pi Zero 2 W — Quality 5 V / 2.5 A micro-USB (or USB-C on newer carriers).
- Pi 3B+ / Pi 4 — Official 5 V / 3 A USB-C (Pi 4) or 2.5 A micro-USB (Pi 3B+).
- Pi 5 — Raspberry Pi 27 W USB-C PSU (5 V / 5 A) with a proper cable.
- Enclosed cases — Ventilation matters; use the case fan header on Pi 4/5 if available.
Before You Start
- Valid amateur radio license — Required for D-Star gateway access.
- MicroSD card — 16 GB or larger, name-brand (Samsung, SanDisk).
- Card reader — USB adapter for your PC or Mac.
- Ethernet or Wi-Fi credentials — Ethernet is more reliable for first boot.
Physical Assembly
- Seat the MMDVM hat firmly on the Pi GPIO header. Attach standoffs first if the kit includes them.
- Connect the OLED ribbon cable if your hat ships with a separate display board.
- Screw the antenna onto the SMA connector hand-tight.
- If using a case, fit the assembly and confirm the Pi can breathe — enclosed Pi 4/5 builds need airflow.
- Do not apply power until the SD card is inserted (next section).
Install Pi-Star (Raspberry Pi OS Lite Image)
Download the current Pi-Star RPi release from pistar.uk/downloads. As of mid-2026, use Pi-Star_RPi_V4.3.x for Pi 5 or Pi-Star_RPi_V4.2.x for older boards.
Step 1: Download the image
- Open pistar.uk/downloads.
- Download the Pi-Star_RPi zip for your hardware.
- Extract the zip; confirm a
.imgfile is inside.
Step 2: Flash the SD card
- Install Raspberry Pi Imager or balenaEtcher.
- Insert the microSD card.
- In Imager, choose Use custom and select the Pi-Star
.img. Do not flash stock Raspberry Pi OS. - Select the correct target drive. Double-check the drive letter.
- Write and verify. Safely eject the card.
Step 3: First boot
- Insert the microSD card into the Pi.
- Connect Ethernet, or plan to configure Wi-Fi after boot.
- Apply power. Allow two to three minutes for first-boot filesystem expansion and reboot.
Step 4: Reach the dashboard
- On a computer on the same LAN, open
http://pi-star.local/admin/. - If mDNS fails, find the Pi’s IP in your router DHCP list and browse to
http://<ip>/admin/. - Default login:
pi-star/raspberry. Change the password before exposing the hotspot to the internet.
Step 5: Wi-Fi (optional)
- Use the Pi-Star WiFi Builder or the admin Wireless Configuration page.
- Reboot after saving credentials.
- Reconnect at
http://pi-star.local/admin/.
Next in this series
Hardware assembled and dashboard reachable? Continue to Part 2: Pi-Star Configuration and D-Star Registration to set your call sign, frequency, reflector, and gateway enrollment. Then Part 3 programs your Icom handheld.