D-Star & Hotspots · Part 3 of 3
Pi-Star D-Star Hotspot, Part 3: Icom ID-51 and ID-52 Radio Configuration
Parts 1 and 2 built and configured the hotspot. Part 3 programs your Icom handheld so the RF link actually works. The ID-51 Plus II, ID-51 Anniversary, ID-52A, and related models all use the same D-Star memory fields. Get RPT1 wrong by one character and the hotspot ignores you completely. The CS-52 / CS-51 memory channel below is enough if you stay in VFO or Memory mode. If you live in Icom DR mode, also add the hotspot to Repeater List.
D-Star Memory Fields (UHF Example)
Gather these values from your Pi-Star configuration before opening the programming software:
| Field | Value | Notes |
|---|---|---|
| Operating mode | DV (Digital Voice) | Not FM analog |
| Frequency | Match Pi-Star (example: 438.8000 MHz) | US operators usually sit around 433–435 or 438.x — check your coordinator; stay off 432–433 and 435–438. See Part 2. |
| Duplex / offset | Simplex (no offset) | Hotspots are simplex nodes, not ±5 MHz repeaters |
| My Call Sign (MYCALL) | Your registered call | Must match D-Star registration |
| RPT1 | CALL B |
Your call, space, module letter — example: KC4SMH B |
| RPT2 | CALL G |
Your call, space, G — example: KC4SMH G |
| UR Call Sign (URCALL) | CQCQCQ |
Standard call channel |
Replace CALL with your call sign and B with the module letter from
Pi-Star Part 2. For 2M builds, use module C and a 145 MHz simplex frequency.
How these fields connect your radio to the hotspot
Every D-Star transmission embeds four call-sign slots in its digital header. Think of them as an address label on each key-up: the radio tells the Pi-Star MMDVM board who is transmitting, which “repeater” it believes it is using, and who it wants to reach. Pi-Star reads that header before it forwards anything to the gateway or reflector. When the fields line up with what you configured in Part 2, audio flows. When they do not — especially RPT1 — the hotspot ignores you with no error message on the radio.
- My Call Sign (MYCALL)
- Your identity. This is the call sign transmitted in every frame and shown on reflector dashboards when you key up. It must match the call you registered at regist.dstargateway.org (Part 2). The global D-Star gateway checks registration before allowing traffic onto the network; an unregistered MYCALL can pass RF to Pi-Star and still produce silence on the reflector.
- RPT1 (Repeater Call Sign 1)
-
The first routing hop — and the field that must match Pi-Star exactly.
On a physical repeater, RPT1 would be that repeater’s call sign and module
(example:
W1ABC B). A Pi-Star hotspot does not emulate someone else’s machine; it presents your call sign plus the module letter from Pi-Star’s D-Star Configuration (example:KC4SMH Bfor 70 cm). Your radio must send the identical string — call, one space, module letter, padded to eight characters in CS-51/CS-52. Pi-Star compares every incoming RPT1 against its own setting. A wrong letter, a missing space, orGinstead ofBmeans the MMDVM never hands your audio to ircDDBGateway. - RPT2 (Repeater Call Sign 2)
-
The gateway hop. D-Star routing uses two repeater fields. RPT2 describes
where traffic goes after RPT1. For hotspot and gateway operation this is almost always your
call sign plus
G(example:KC4SMH G) — theGsuffix means “gateway,” telling the stack to leave the local RF link and enter the internet-side D-Star gateway. RPT2 is the same on every Pi-Star memory channel; you do not change it when switching reflectors. Omit it or typo it and you can pass the RPT1 check and still fail to reach the reflector. - UR Call Sign (URCALL)
-
Who you are calling. On a linked reflector, routine ragchew uses
CQCQCQ— the conventional “anyone on this channel” destination, similar to CQ on FM. Pi-Star forwards your voice to whichever reflector module is currently linked (configured in Part 2 or changed later); URCALL does not need to name the reflector for normal QSOs. To call a specific station you change URCALL to their call sign. Separate 8-character URCALL codes can also command link, unlink, and utility functions from the radio (see URCALL commands below) while RPT1 and RPT2 stay fixed.
One key-up, four fields
MYCALL identifies you, RPT1/RPT2 authenticate the hotspot path, URCALL selects the destination. All four are programmed in the DV memory channel.
Configure ID-52A with CS-52
Programming software and cable
Icom’s CS-52 cloning software is Windows only. On a PC, download it from Icom’s website and connect the radio with an OPC-478U (or equivalent) cloning cable. If your PC has no serial port, use a USB–RS-232 adapter with an FTDI or genuine Prolific chip — cheap clone adapters often fail with Icom software.
macOS options:
- RT Systems WCS-D52 — Native Mac programming software for the ID-52A. Includes Mac drivers, a USB cable matched to the radio, and a built-in D-Star Calculator that can populate hotspot RPT1/RPT2 fields. Available from RT Systems.
- Windows on Mac — Run Icom CS-52 inside Parallels, VMware Fusion, or Boot Camp if you already have a Windows license and prefer the free Icom software.
The steps below use Icom CS-52 menu names (Radio → Read from Radio, etc.). RT Systems uses Communications → Get data from radio and Communications → Send data to radio, but the D-Star memory fields are the same.
- Install your programming software and connect the cloning cable. Confirm the computer sees the radio before editing memories.
- Download the current configuration (Radio → Read from Radio in CS-52).
- Create a memory channel named
Pi-Star UHF. - Set Band to 70 cm, Mode to DV, Duplex to Simplex.
- Enter the frequency matching Pi-Star (example: 438.800000 MHz). US operators usually sit around 433–435 or 438.x — check your coordinator; stay off 432–433 and 435–438.
- Open the channel’s Digital Data or D-Star tab.
- Enter My Call Sign.
- Enter Repeater Call Sign (RPT1) — example:
KC4SMH B(eight characters; pad with spaces in fixed-width fields). - Enter Repeater Call Sign (RPT2) — example:
KC4SMH G. - Enter UR Call Sign as
CQCQCQ. - Store in a convenient bank (Bank A slot 1 works well).
- Write the configuration back to the radio.
Optional: Reassign the LO soft key to CS (ID-52)
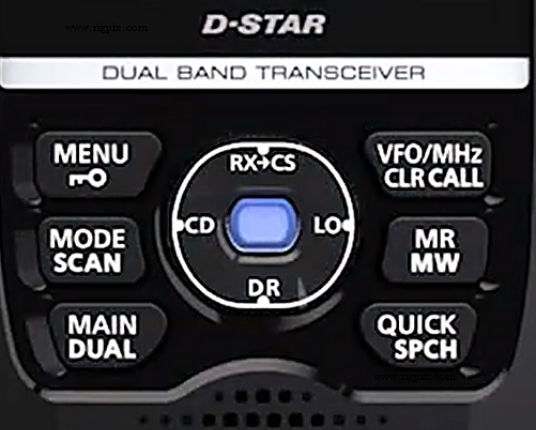
Out of the box, the ID-52 DV screen shows a soft key labeled LO (Local). That opens Icom’s near repeater search — a GPS-assisted scan of the built-in FM and D-Star repeater database. Handy when you are mobile and want the closest machine in an unfamiliar area. On a desk or home Pi-Star hotspot, it is far less useful: your RPT1, RPT2, and frequency are already fixed in the Pi-Star memory you programmed above.
CS (Call Sign) opens the UR call sign selector so you can jump between
CQCQCQ and your programmed UR memories without menu diving. That matters on a
reflector: routine ragchew stays on CQCQCQ, but calling a specific station means
changing URCALL. One tap on CS is faster than scrolling through Set menus.
The same UR memories are useful for the link/unlink commands described in the next section.
In CS-52:
- With the radio connected, open Set → Set Mode → DV Set Mode.
- Open Set Key (shown as DV Soft Key on some CS-52 builds).
- Find the slot mapped to LO and change its function to CS.
- Write the configuration back to the radio.
On the radio: MENU → Set → Set Key → DV exposes the same assignments if you prefer to change it in the field without a PC.
This is optional and ID-52-specific; the ID-51 screen layout differs. If you operate mobile
through real repeaters as well as your hotspot, keep LO on a DV soft key you use
for travel and assign CS to a different slot instead of replacing LO.
ID-52 Repeater List (the FROM menu)
If you live in Icom DR mode, the hotspot has to be in Repeater List, not only in a VFO or CS-52 memory. That is where ID-52 owners get stuck: they add the Pi-Star, set USE (FROM) to YES, and it still never appears under FROM — or it appears and the dashboard stays silent when they key up.
Pi-Star requires RPT1 and RPT2 on the air. A Repeater
List entry of type DV Simplex has no CALL SIGN or GW CALL
SIGN fields, so the radio sends a simplex header with those slots unused
— and Pi-Star ignores you. Use type DV Repeater and a
zero offset so the radio still transmits CALL B /
CALL G.
A DV Repeater entry with DUP OFF is hidden from FROM
— the radio does not believe a repeater can be simplex. Set DUP+ or
DUP− with offset 00000.00. That is the correct Pi-Star
type, not a workaround.
- Put the radio in DR mode.
- Menu → Memory (page 2) → Repeater List → pick a group → Quick → Add.
- First field is TYPE. Choose DV Repeater, not DV Simplex.
- NAME something you will recognize (Pi-Star, home, and so on). Sub name can stay empty.
- CALL SIGN — your call, space, module letter, padded to eight characters (example:
KC4SMH B). This becomes RPT1. - GW CALL SIGN — your call, space,
G(example:KC4SMH G). Icom often fills this when you enter CALL SIGN. This becomes RPT2. - USE (FROM): YES — otherwise it never appears in FROM even with the right type.
- FREQUENCY: match Pi-Star. US operators usually sit around 433–435 or 438.x (example: 438.8000 MHz) — check your coordinator; stay off 432–433 and 435–438.
- DUP + or −, OFFSET FREQ
00000.00. If DUP is OFF, FROM hides the entry. - Save. On the DR screen, FROM is the Pi-Star and TO is
CQCQCQ.
Do not leave TO on Local CQ — that sets RPT2 to unused
and the reflector never hears you. Use Gateway CQ or CQCQCQ so
RPT2 stays CALL G. ID-51 menus say Menu → DV Memory;
the TYPE values are the same. You can still skip DR and use the CS-52 memory
channel above if you prefer.

| Field | Value | Notes |
|---|---|---|
| TYPE | DV Repeater | Not DV Simplex. CALL SIGN and GW CALL SIGN only exist on this type. |
| NAME | Pi-Star (or similar) | Whatever you want to see in FROM. |
| CALL SIGN | CALL B |
RPT1 — same eight-character string as the CS-52 memory. |
| GW CALL SIGN | CALL G |
RPT2. Icom often fills G when you enter CALL SIGN. |
| USE (FROM) | YES | NO hides the entry from the FROM menu. |
| FREQUENCY | Same as Pi-Star | Must match Part 2. US operators usually sit around 433–435 or 438.x (example: 438.8000). |
| DUP / OFFSET | DUP+ or DUP− / 00000.00 |
DUP OFF hides it from FROM. Zero offset keeps RF simplex. |
Configure ID-51 Plus II with CS-51
Icom’s CS-51 is also Windows only. Mac users can use RT Systems WCS-D51 (native macOS, same cable-and-driver bundle approach as WCS-D52) or run CS-51 in a Windows VM. The memory workflow matches the ID-52 steps above; the ID-51 screen is smaller but the D-Star fields are identical.
In RT Systems on either platform, open the D-Star Calculator, choose HotSpot as the source, enter your call sign and frequency, and let the software populate RPT1 and RPT2.
Global D-Star settings (both radios)
While connected in CS-51, CS-52, or RT Systems, also set:
- My Callsign list — Your registered call as the default.
- UR Callsign memory 1 —
CQCQCQ(routine reflector QSOs). - UR Callsign memory 2–5 — Optional link/unlink and utility codes from the table below.
- TX Message — Optional 20-character banner sent with your transmission.
URCALL Commands: Link, Unlink, and Utilities
Pi-Star’s ircDDBGateway watches the UR Call Sign field in your
D-Star transmission. Besides CQCQCQ for normal QSOs, you can program
8-character URCALL codes that tell the hotspot to link a reflector, drop a
link, or run a utility function — no web dashboard required. RPT1 and RPT2 stay the same
as your Pi-Star memory; only URCALL changes between command channels.
Icom fields are fixed width (eight characters). Pad with spaces where shown. The
eighth character is often the command letter for utilities; reflector links
append L after the module letter.
| Function | URCALL (8 chars) | How to use |
|---|---|---|
| Routine QSO | CQCQCQ |
Default ragchew on the linked reflector |
| Link XLX reflector | XLX102BL |
Link to XLX102 module B — pattern: reflector name + module + L |
| Link DCS reflector | DCS102BL |
Same pattern for DCS (example: DCS102 module B) |
| Unlink | U |
Seven spaces, then U — drops the current reflector link |
| Echo test | E |
Seven spaces, then E — gateway plays your audio back |
| Link status | I |
Seven spaces, then I — gateway announces linked reflector or unlinked |
Replace XLX102BL with your target reflector and module. Examples for the ARRG.US
array: XLX103CL (XLX103 module C), XLX104CL (XLX104 module C).
Count characters — the full URCALL must be exactly eight.
Program command memories in CS-52 / CS-51
- Duplicate your Pi-Star DV memory for each command (or use UR call sign memories if you prefer one RF channel).
- Keep RPT1, RPT2, frequency, and DV mode identical on every copy.
- Set UR Call Sign to the command code from the table — pad with spaces to eight characters in fixed-width fields.
- Name channels clearly (examples:
Pi-Star QSO,Link XLX102B,Unlink,Echo). - Store link/unlink codes in UR call sign memories 2–5 for quick access via the
CSsoft key on the ID-52. - Write the configuration back to the radio.
Send a command from the radio
- Select the command memory (or set URCALL via the
CSsoft key). - Key up briefly without talking — a half-second PTT tap is enough.
- Wait a few seconds. Check Pi-Star Admin or listen for the gateway voice prompt on
I/Ecommands. - Switch back to the
CQCQCQmemory before calling CQ or joining a net.
Operating and First QSO
- Select the Pi-Star memory channel on the radio.
- Confirm the display shows DV mode and the correct frequency.
- Press PTT briefly. Watch Pi-Star Admin → Last Heard — your call sign should appear within seconds.
- Transmit a test: “KC4SMH testing Pi-Star hotspot.”
- To change reflectors from the radio, use a link URCALL memory (see URCALL commands) or Pi-Star Admin → D-Star Link Manager. Use
CQCQCQfor routine QSOs. - Check into a net on XLX102B or monitor the ARRG.US dashboard.
Radio-Side Troubleshooting
| Symptom | Likely cause | Fix |
|---|---|---|
| Radio keys up; dashboard silent | RPT1 mismatch or FM instead of DV | Match RPT1 module to Pi-Star; confirm DV mode and frequency |
| Pi-Star missing from ID-52 FROM | Repeater List TYPE is DV Repeater with DUP OFF, or USE (FROM) is NO | Set DUP+ or DUP− / 00000.00, USE (FROM) YES. See Repeater List |
| FROM shows the hotspot; dashboard still silent | TYPE is DV Simplex, or TO is Local CQ | Change TYPE to DV Repeater so CALL SIGN / GW CALL SIGN are sent; set TO to CQCQCQ / Gateway CQ, not Local CQ |
| Dashboard shows activity; no audio on reflector | D-Star registration incomplete | See Part 2 registration |
| Garbled or R2-D2 audio | Low RF coupling to hotspot | Move closer; improve antenna; reduce Wi-Fi/USB noise near the hat |
| PTT works locally; never heard on reflector | RPT2 missing or wrong | Confirm CALL G in RPT2 field |
Complete Chain
All three parts complete the path from your handheld to the reflector network.
The Bottom Line
The radio side is three fields and a frequency: RPT1, RPT2, and URCALL, on a DV simplex channel matching Pi-Star. Nail those and the ARRG.US reflectors are a memory channel and a PTT press away. If you are still building, start at Part 1.